Sunday 25 March 2012

Week 7- Skirt 3

This week we were making a third skirt and my team and I chose to work with a mix of wool fabric. When I got the fabric, it directly reminded me of the all times classic Chanel suit so I thought I wanted to make a really ladylike skirt, and the colours of the fabric which where really light ones made me want to add the cute element in my skirt. After some research I did to relevant designers I started experimenting on the stand.I started by cutting 6 pieces in rectangular shapes of different lengths. I also wanted to add small pieces of lace in the end of each piece in order to show where each piece ended and for decoration.

Then I used a basic block for skirt to make the lining on which all the pieces would be held.
 I sewed the pieces on the middle front and back and under it, I added 6 small pieced of fabric in the shape of a loop. I also added the zip on the lining piece because i wanted it to be hidden under the wool.

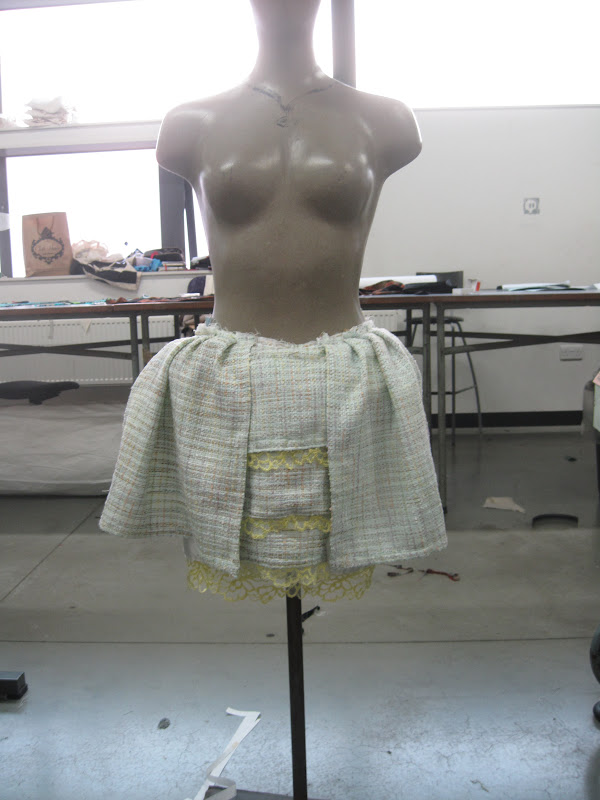
Then for the sides I used 2 big square pieces of fabric with a kind of pleat on the top.


And the surprise!!! This skirt can be worn with tulle enforcement under the fabric to give an extra volume to the shape! 


The zip is now hidden 

and over it, in order for the body to be able for the body to feet in, in the area of the hip, I allowed 10 cm of fabric which has a button hole and closes on a button


\


Inspiration:


General comments about the garment:

This week I was very satisfied by how the skirt worked because it represented exactly what I thought about making with the use of this fabric. I believe that the best feature of the skirt was the multiple use of it- the fact that it can be worn as a morning skirt without the tulle under it and also it can be transformed into a more formal skirt for evening wear. I also likes the antithesis between the horizontal  lines of the middle front and back in contrast to the vertical side ones. I think this skirt can easily be called fashion because the design of it might be not that complicated but it is a skirt that can be worn easily by almost every woman of every age and it is not a simple skirt the same time. A problem I faced was the place of the zip because I wanted it to be hidden and not sewed on the woolen fabric because that would destroy the form and the volume around the hip when I would add the tulle. So when I sewed the top fabric , i wanted it to form the same pleats as the other side had already but this would mean that the zip had no use and that no person could feet in. This problem made me discover my own opening style which was the extra fabric allowance that would then fold and close to a button. Another problem that teached me something new was that the fabric was fraying a lot and after i pressed it for some time is shrieked and that made is fray less. 
The thing I believe I should try to improve next time is creating a more complicated design that would set the level higher and will be more challenging.
The fabric I used for the making of this skirt was cotton elastic wool and I used 1 meter for the whole garment. The fabric costed  5 pounds per meter and it was sourced at Fabric Land.


Sunday 18 March 2012

week 6- Trousers 2

This week we had to make a second pair of trousers and my team and I worked with stretchy cotton  satin. I decided I wanted to make men's trousers once I had never done it before and I thought it would be challenging for me. I wanted to experiment with the fabric and the shape and create a style that didn't remind anything of the usual Saville Row style men's trousers. When I got the fabric I came up with the idea to pleat it and see what happens. I likes the effect and the movement of the pleats when they where not totally pressed but opened for some millimeters. So, for the front surface I sewed about 15 centimeter on each pleat vertical on top and bottom in order to keep the pleat design in place and let it keep the movement on the middle area of the legs.


For the back, I wanted to keep it simpler because I thought that the front surface had too much information, so I decided to use only one pleat in the middle and try adding jet pockets. The next step was to attach the front part to the back and add the waistband. The trousers where ready.


General comments about the garment:

Even thought I was not very satisfied when I finished the pair of trousers, when I saw it worn on a human body and on the move I thought that it finally worked really well as an idea. I found the form of really different, interesting and far from the idea of people about mens trousers. The problem of the trouser were the colour and fabric of it, and that is a reason why I would not call it fashion, even though I that if it was executed in different material it would be really fashionable. The main problems I faced while contracting it, was that I didn't use a trouser block from the beginning and so after I pleated the pieces of fabric, it came out smaller that the basic men's trouser block and so after I sewed it, the fabric was stretching in order for the body to feet in, which made different openings on the top and the bottom of the legs. Another problem the trouser had were the pockets which were not sewed well on the right and left side. The whole construction of the trousers was not very careful because I got the fabric on Thursday morning so I practically has only some hours to finish it and that was a big minus to my work.
The thing I should improve for next time is the making of the details such as pockets and ask for some guidance on how some certain part of a garment are made, such as the jet pockets. The fabric we used for the trousers was stretchy cotton satin and I used 2 meters. The fabric costed 6 pounds per meter and it was sourced at UK fabrics at Goldhawk Road.


Saturday 10 March 2012

week 5- Dress 2

The fifth week of the module found us making a second dress and I chose a polyester organndie fabric with a metalic blue effect. The fabric reminded me of  a fairytale according to its shine and so i decided to make a theatrical dress with a kind of victorian feeling, so my favorite style!
I started experimenting on the stand for the front top of the dress which I wanted to look like a kind of corset. For this reason I thought that the french seam inside out, would work as a nice interpretation of the lines of a corset. The back of the top would be a simple design based on the basic back bodice block.


The next part of the top was the one of the chest and I wanted an opening in the middle so I came up with this shape.


In order to decorate the top, I added a line of lace with a beautiful design and this made the design look even more royal.

Then I added two buttons on the top as a decoration and so that the two pieces of the chest could close and come to an equal height.


The next step to add the sleeves which I wanted to form a gathering to increase the feeling of medieval, so using a block for sleeves, I increased the upper curve so that there is more fabric left for the gathering. I finally added the same lace on the end of it.


For the bottom part of the dress I wanted volume. So i added 4 layers of white tulle and 3 layers of my basic fabric in the form of gathering.


I sewed the top and bottom part together and the basic structure of the dress was ready. Then I added a zip on the back and a big collar on the top around the neck.


The dress was finalised!


Inspiration Pictures:


General comments about the garment:
 I believe that this garment is the best one I have made until now both in the design and structure aspect. I took many hours in the making of it and I learnt a lot out of it as the stability of the fabric was on my side. I think that it worked really well as a garment because it illustrated exactly what I had in my mind. On the other hand I don't know if it could be called fashion as the design as I explained earlier is more theatrical, even thought I, personally, would wear it, but I believe someone would not wear it that easy and go out on the street, except for a very special occasion. For an opening I used a zip on the back of the dress that reaches the hip line. A problem I faced this time was in the placement of the lace in front of the bust and that was obvious on my dress. The shape of the bust cut was curved and the shape of the lace was straight so when I sewed it on the bust line, it came out to gather a lot and not laying flat on the dress as I planned it.
A very important thing I should do the next time for the making of the trouser 2, is adding pockets and trying some more garment details, because I believe that will be more challenging for me and teach me a lot.
The fabric I used for this dress was polyester organdie and I used 3 meters for the making of it. The price of the fabric is 6.90 pounds per meter, but the fact that I bought 15 meters for all the members of the group, decreased the price to 5 pounds a meter. The fabric can be sourced at ' Toni Textiles' at Goldhawk Road.