Friday 18 November 2011

Ninth ' Explore Creativity' lesson- Garment patterns


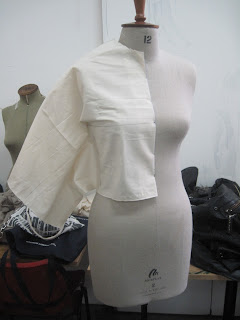
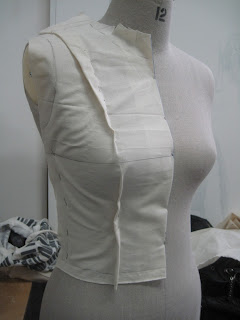
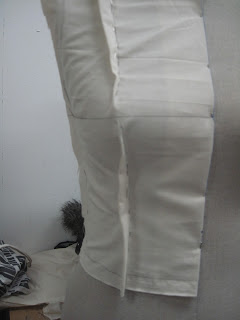
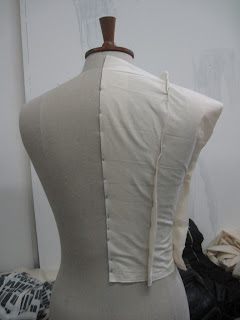
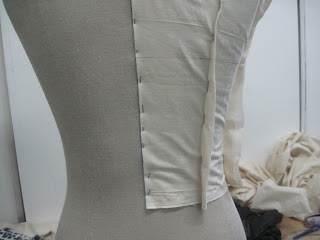
This weeks lesson aim was to teach the students of the class, create a garment pattern and understanding the whole process of it on a human body. Starting with the pattern of a woman's top, the tutors illustrated in simple steps how we start a pattern. Then, spreading up in teams of two, we had to taken responsibility of the front and the back, so I chose to do the front.The process of a pattern goes as following. First step is taking a piece of fabric 60x60 cm and creating a line that leaves a distance of 5cm from the end. This will be the allowing line for middle. Then with a different pen colour, we have to create a vertical line which will be the one that passes over the breast area and will be a guide line for the seams.The next step is placing the one line passing from the middle of the mannequin to the side of the belly.The same is for the back. When having placed the fabric straight, there should be one part on the top and one on the lower part vertically. This is the part where we take those leftovers and pinning them together in a way that they follow the body line.


The next step was preparing the pattern. First we had to take the piece of fabric of the mannequin and
place it on a paper. Then following all the lines with a tracing wheel to make the stamp of the outline of the top on the paper. The next part is to join the lines with each other and the pattern is ready!


After that, I decided to  make a new top out of the pattern, so I had to  transfer the new pattern to another  piece of fabric. I placed the pattern on the fabric and i cut around it by following the edges of the pattern. Then I took the tracing wheel and pressed the lines of the seams. When I finishes, the new top was made. The only thing left, was stitching the seam lines together and putting it together with the back part.


 After me and Stellina did that, we decided to make a skirt for the body and painting the top to decorate it.


Saturday 12 November 2011

Eighth 'Explore Creativity' lesson- Pleating techniques

This week's session aimed to teach the students a new, extremely interesting technique called pleating'.The main idea is creating lines on a paper, folding them in any preference, then adding a piece of fabric in between two same folded papers, ironing it for for 15 minutes to half an hour, and then the chose shape will be transferred to the fabric.
The class started with a presentation of the owner of  Ciment Pleating , who explained us the process of pleating and brought many different pleated samples for the students to see.


Then the class started with two basic pleating techniques which where achieved by folding straight lines.

knife pleat


box pleat
The next  pleating technique was like accordion and it was more complex, so Caryl Court explains in simple steps how it works, in the following videos:


And this is my try:


Coming back home I continued trying some other pleating techniques with the help of the internet and books.I created some more pleated fabrics and the process is shown in the following pictures. The first one starts with the rule " score-create-press-release" and it starts with the following pattern:


The next technique is based on the rule 'fold-create-fold-pleat' and it was a try to create triangles.You can find the technique in the book Folding Architecture:


Another pleating style I found in the book Supersurfaces was the following one and it is easy to achieve by following the steps in the following pictures that i took while the process:


Origami shape by Issey Miyake

 One last pleating style I created, was an own try of mine, to create a new shape out of the combination of the previous techniques i practiced on. Following this pattern, you will be able to shape the following result.


origami dress( not by me)


Shenaz Engineer:
The following pictures are from the fall/winter 2011 collection of Shenaz Engineer and I find them very interesing and they include creative pleating techniques.


Sunday 6 November 2011

Seventh 'Explore Creativity' lesson- Dressing Chairs Up!

In this week's session, the activity was to split up in groups of two people and dress up a chair of our choice with the jackets we used last week. The purpose of this activity was learning new techniques and experiment on different original new shapes. After fitting the jackets on the chairs, we had to carefully take the of and try how they could be able to stand on the mannequin and if they could whether work nicely or not.
chair

chair with jackets
 Here are the first two examples who worked quite well and they formed a nice result that looks simple but elegant.
first dress

details

second dress

lower details
page from my sketchbook
The next shape which was formed out of the same pattern as the two previous ones, was more of a balloon dress and was split in two colours- parts, grey and black and looked like this.
third dress

details

back

left side

page from my sketchbook

The dress that came after, was a more abstract version of the ones before. It resulted out of the combination of the four parts of the jackets,the two linings and the two outer pieces, put together in random shapes.
fourth dress

looking deeper

fifth dress

page from my sketcbook
Another dress we created, had more details and the lower part looked like a formal office skirt.
sixth dress

upper details

lower details

page from my sketchbook