Saturday, 10 March 2012

week 5- Dress 2

The fifth week of the module found us making a second dress and I chose a polyester organndie fabric with a metalic blue effect. The fabric reminded me of  a fairytale according to its shine and so i decided to make a theatrical dress with a kind of victorian feeling, so my favorite style!
I started experimenting on the stand for the front top of the dress which I wanted to look like a kind of corset. For this reason I thought that the french seam inside out, would work as a nice interpretation of the lines of a corset. The back of the top would be a simple design based on the basic back bodice block.


The next part of the top was the one of the chest and I wanted an opening in the middle so I came up with this shape.


In order to decorate the top, I added a line of lace with a beautiful design and this made the design look even more royal.

Then I added two buttons on the top as a decoration and so that the two pieces of the chest could close and come to an equal height.


The next step to add the sleeves which I wanted to form a gathering to increase the feeling of medieval, so using a block for sleeves, I increased the upper curve so that there is more fabric left for the gathering. I finally added the same lace on the end of it.


For the bottom part of the dress I wanted volume. So i added 4 layers of white tulle and 3 layers of my basic fabric in the form of gathering.


I sewed the top and bottom part together and the basic structure of the dress was ready. Then I added a zip on the back and a big collar on the top around the neck.


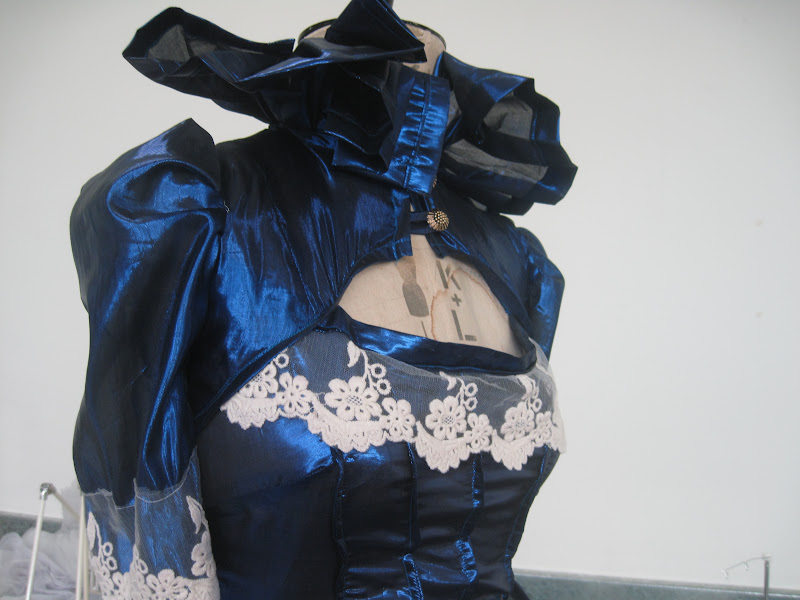


The dress was finalised!


Inspiration Pictures:


General comments about the garment:
 I believe that this garment is the best one I have made until now both in the design and structure aspect. I took many hours in the making of it and I learnt a lot out of it as the stability of the fabric was on my side. I think that it worked really well as a garment because it illustrated exactly what I had in my mind. On the other hand I don't know if it could be called fashion as the design as I explained earlier is more theatrical, even thought I, personally, would wear it, but I believe someone would not wear it that easy and go out on the street, except for a very special occasion. For an opening I used a zip on the back of the dress that reaches the hip line. A problem I faced this time was in the placement of the lace in front of the bust and that was obvious on my dress. The shape of the bust cut was curved and the shape of the lace was straight so when I sewed it on the bust line, it came out to gather a lot and not laying flat on the dress as I planned it.
A very important thing I should do the next time for the making of the trouser 2, is adding pockets and trying some more garment details, because I believe that will be more challenging for me and teach me a lot.
The fabric I used for this dress was polyester organdie and I used 3 meters for the making of it. The price of the fabric is 6.90 pounds per meter, but the fact that I bought 15 meters for all the members of the group, decreased the price to 5 pounds a meter. The fabric can be sourced at ' Toni Textiles' at Goldhawk Road.


Sunday, 4 March 2012

week 4- skirt 2

On the fourth week of this module, we had to make a second skirt and in my team, we worked with a white poly-amide fabric that is usually used for curtain finishes. This made the process of making and experimenting much more interesting, as this fabric is really extraordinary and I found it really interesting to work with.The fabric was of middle thickness and so, when coming into the workroom, I had already decided I want to create a structured skirt.

I did not use any pattern block, as I wanted to create my own shape and I started with this cut, using double surface.

I sewed the two pieces of fabric with each other, creating small lines with a 4mm empty space so that a metallic wire could feet in. 

 The same happened for both front and back parts of the skirt.

This is how it looked with the wire inside, but before I formed it.


 I, then added two zips on the back of the skirt.


From the research I had earlier conducted,  I came up with this shape, after I formed the metallic wires.


But coming into the workroom the next morning, I decided I wanted to change the shape and try another one. So I bent the wire two times , so that the shape looks like layers.


I added the waistband in the form of gathering, to create a ballerina feeling in the skirt, and the design was completed!


My ballerina model right before the catwalk


My inspiration pictures:


General comments about the garment:

In my opinion it worked very well as a garment, it came out 90% of what I expected and imagined it to be, but I still am satisfied. For the fact that I like creating avant-garde style garments, I believe my idea and experimentation paid out well and I could personally imagine a whole collection based on the roots of this garment. The only thing that I disagree with, is the colour of the skirt, which was white- I would prefer to see it in a brighter and stronger colour, or in a printed fabric with bohemian shapes. The thing that made me proud is that both my model and a classmate of mine, said they would really wear it to go out. 
The problem I faced with this garment was pattern I created which was not really accurate and so when I bent the wires, the fabric shaped many creases all over the skirt, something I did not want. Another problem I had was that I rushed to form the shape I wanted, without having the waistband added, and so I found trouble sewing it afterwards without destroying the shape.
For an opening, I used two zips on the back of my skirt, in this way I had a bigger space for the body to feet in, especially in the area around the lower waist.
The thing I should definitely try to improve next time, is my finishes and my sewing skills.
For the making of the skirt I used polyamide fabric, 2 meter, with about 0,5 cm spare left. It costed me 3,5 pounds a meter.